Sunday 29 December 2013

Crochet a long

The craft group I belong to is running a square/hexagon(or whatever shape you want really) a day 2014 blanket project on Facebook,I have decided to do Attic24s hexagon pattern(for the moment,I may mix it up later) 


Love this website,if you haven't checked it out yet,you should,lovely inspiring colours and projects and image heavy walkthroughs of patterns.
Have been naughty and started making hexagons already,in my defence am at my sons for Christmas and got wool as a present so am road testing both the wool and pattern,I bought spool knitting with me but there's only so much you can do before your arm wears out!!!
So here are my first attempts


Not perfect but not too bad,don't think they are all the same size and not sure how to sort that as they're all the same wool.hoping my tension will become more even the more I make. Haven't decided on a colour scheme yet for my actual blanket,tempted to go totally random,in which case these hexagons can be part of it,but how to avoid getting garish colour clashes?! Decisions decisions!!!


Wednesday 25 December 2013

Merry Christmas


Merry Christmas everyone,am busy making lots of spool knitted lengths for my next project....this spool knitter by prym is much faster than the usual knitting Nancy's in that it has a rotating handle and hooks that go up and down,catching and releasing the wool and basically doing the work for you,very addictive!!!


Luminous lengths of spool knitting,what will they become I wonder?......
 

Christmas crafting!!!

Wednesday 11 December 2013

More hats


More hats! Have been experimenting with different colour ways,love mixing different yarns together,the result is always a surprise!! bottom hat is waaaay brighter in real life,I didn't finish it til silly o'clock and took a picture in poor lighting. First hat with a flower on it,yay!!! 


Monday 2 December 2013

Monkey spanner


Above picture is of me working out a crocheted spanner to go with a monkey I made for my partner. The spanner is my own pattern,the monkey is from my crochet gifts magazine mentioned in an earlier post. This was made for my partner as it was out three year anniversary of being together,it's a personal joke and he loves monkeys so knew he would love it,was initially going to prop the monkey up with the spanner somehow but at last minute decided would be better to sew him to it so he stands up well.


Hats


Been busy making hats recently,the hat at the top right is sporting a bobble instead of a pompom as my hands aren't strong enough to tie a tight safe pompom and I was worried they would fall to bits. I thought about and decided a large bobble would be better, will post more pics when get the chance but have been having fun finding fluffy looking wool to make bobbles with so they look like pom-poms!!also been experimenting with stripes.

Friday 8 November 2013

Travel crochet hook holder


Ever struggled to find your crochet hooks (that you take everywhere) from the pits of your handbag or the depths of your rucksack,usually in the car when they will suddenly launch themselves out of said bag down the side of the seat!!!!then you need an extending magnetic pickerupper(technical term!) I have one of these courtesy of my partner.
An altogether more sedate idea is to have your needles easily accessible in a handy holder,if you have a particularly messy bag then a very bright colour is a great idea as you'll never miss it! Instead of an almighty rummage you sedately take out your travel size  crochet hook holder and away you go!


Travel crochet hook holder

Double knit yarn
Size 4mm crochet hook

This is my process for making the hook holder
Cast on 11 stitches ( this determines the width and can be changed if you want a wider holder)
Sc in the second stitch and then across the row,at the last stitch sc two more times to turn the corner
Sc across the other side of the cast on chain,with two extra stitches in the last/corner stitch to turn the other corner.this will leave you with a chain surrounded by sc with two turning corners(hope that makes sense?)
 Sc around in a spiral until the flat tube is the height of your needles
At the top crochet back and foward in sc to form the flap,after two rows do the following to make a buttonhole
Sc 3 stitches chain 4 stitches sc 3 stitches til end 
On the next row sc into the chain stitches,sc across the row
On next row sc across
Sc around the edge to neaten
Sew a button on and you're done
Encase your hooks and go on an adventure!


Thursday 7 November 2013

Sunshine

Every rainbow heralds the sunshine so it makes sense that my next crochet item should be the sun!
My partners niece does sign language for babies and wanted a 3D sunshine for the song you are my sunshine,after some online perusal I found the perfect pattern,lo and behold I already had it in my magazine stash!!!


The magazine crochet gift list which I think I bought last year is packed full of fun projects for various occasions,am itching to do the gingerbread house next if can find the time among other projects!

The pattern for the sunshine was part of a pattern for a babies mobile


I decided to keep it simple and just make the sun,changing safety eyes for crocheted eyes for extra safety. I crocheted a strap on the back so the sun could be held easily during the song. 


Very happy with the result and apparently the babies love it!


Sunday 29 September 2013

Rainbow

Have been busy making lots of teeny tiny balls,pattern from the ever inspiring attic24 go to her blog Attic24 scroll down to bottom of post about crocheted lampshade ( on my to do list!!) and you will quickly be addicted.


I have also started making birds which I made up as I went along (winging it ...groan!) . I am making these to string up and hang like those cloth birds you get in hippy shops. Every time I see one I think....I could make that,so am calling myself on it!


This bird is basically a crocheted circle folded in half with a few stitches extended for the tail,this first one has a tail that's a bit too chunky so am going to change that for the next one.the eyes are chain stitch and the wing a semi circle,don't know if Its the right technique but I just started as if to make a circle and turned round when I got half way. Am happy with him,he's so cute!!!!


He's now got a friend and am much happier with his tail,it's so much perkier!!!!This is the wooly jolly mess my table gets in when I'm making things!! I was thinking about whether to just have birds and the teeny balls or whether to add other pretty happy things, hmmm... Went off in search of ideas and found a pattern on craftsy for a rainbow. many brain meanderings later I find myself on a rainbow coloured tangent making a rainbow picture!!!! The birds have no eye dear where I've gone!


The picture is supported by a canvas.i single crocheted the two sides together,then the baubles caught my eye,going with the idea that you can never have too much rainbow,I rustled up more little baubles and fastened them around the picture at the point of shells made of trebles ( oh how I love trebles!) very happy with the result.
Oh dear my table has gotten worse in the night!!!!!


Really want to crochet some more today but don't know if hands up to it,so many ideas so little time!!!!  

Now where did those birds go?


Tuesday 3 September 2013

Raw Kale Crisps

Having tasted the amazing raw kale crisps from Inspiral,I have always wanted to make my own. I didn't really want to use store bought kale and have failed miserably at growing my own ( I do not have green fingers at all!) I looked all over Peterborough market to no avail,maybe it's not the season? So,cut to me emerging from Sainsburys with two huge bags of pre cut Kale in my arms.
I watched this video from the raw food world and used it as a starting point
http://m.youtube.com/watch?v=RyxVnBw10wY
Matt Monarch and his wife Angela Stokes Monarch are very well known in the raw food world and have various videos on you tube, They are very easy to watch and make raw food interesting and fun! Apart from you tube Angela has her own website and Matt has 3!,these can be found through the raw food world website
Raw food world

NOTE you will need a dehydrator for this recipe


Kale Crisps


Cashew nuts 500g soaked two hours to soften

Nutritional yeast
Lemon juice
Chilli powder
Curry powder
Turmeric
Paprika
Onion powder


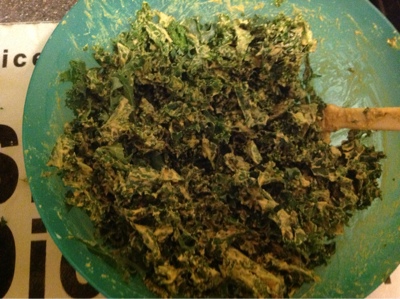
I prepared the kale by cutting out all the stems that were left in from the kale being chopped up.I really would have preferred fresh,in which case i would have left the leaves whole and stripped the stems individually.I soaked a small bag of cashew nuts and blended this with the soak water. My blender is not a high speed oneso I ended up finishing it off in the nut grinder because there were small bits of nuts still showong. The nut blender makes the cashews smooth and creamy. Then its just a case of blending in all the other ingredients and pouring the resulting sauce over the kale.


This is the fun bit,to get all the sauce incorporated into the kale,use your hands to mix and massage the sauce well so all parts of the kale are covered,the lemon juice will wilt the kale slightly and soften it. When the kale is totally covered,spread it thinly onto dehydrator trays.


Dehydrate at 115 for about 4-6 hours or until crisp.
Try not to eat it all at once,beware this is incredibly more ish but luckily very good for you, kale is full of vitamins a,c and k and fibre among other goodies.
If I were to make this again I would use double the amount of cashew nuts to make a more "candied " texture.I would also use home grown kale as shop bought is chopped too small and will have suffered some loss of vitamins in the storage.I would also make much much more as its awesome!!!!

Monday 22 July 2013

The Nectar Norwich


The Nectar
16 Onley Street
Norwich
NR2 2EB

I found the Nectar cafe on the Internet as I was visiting Norwich and wanted to find a vegan place to eat. It would be hard to find this gem of a place otherwise as it is on a residential street on the edge of Norwich.

The cafe is teeny tiny,two tables inside and a bar but is lovely and light and airy due to the large windows but its also cosy with warm wooden tables and the girl serving us was friendly chatty and smiley,the sun was shining through the window and we immediately felt relaxed as we sat at the sunny window on cushions in front of healthy tomato plants growing in the windowsill.The menu is written on chalk boards in colourful writing, behind the counter is stacked high with containers full of seeds and spices, the counter boasts intriguing raw cakes such as carrot cake and there were lots of interesting local info and a shelf full of raw and veggie books. Outside if you are feeling energetic there was a bike powered smoothie maker!!


We ordered drinks first and I had a thick shake called a green dream which was full of good things including banana, spinach, and almond milk. My partner had a mocha maca which was made with organic cow’s milk, maca and cocoa powder.
I ordered a raw sprouted buckwheat pizza with cashew cheese, raw sun dried tomato sauce and seasonal vegetables. The wait was about 10 minutes but was a enjoyable one spent chatting to the other customers and enjoying our milkshakes.


Wow it was worth the wait! My food came and it looked amazing, a riot of colour and textures, the pizza was a wedge of rich tasty crunchiness topped with lots of vegetables and a creamy dressing which I found to be cashew cheese, oh my it was delicious! Now I have made cashew cheese before but never to the creamy mindblowingly gorgeousness that this was! I was literally in food heaven! the salad next to the pizza was piled precariously high with all manner of leaves and grated beetroot ,carrot, sprouted nutty seeds and a huge piece of creamy avocado fanned out on top. Absolutely delicious food, undoubtedly the best food I have ever tasted! the mix of colours, textures and tastes was inspired. I was really sad when I had finished my food and wished I could have eaten it all over again, where's a time machine when you really need one?!


 After eating I knew I had to have some cashew cheese again and to my delight found that Nectar sell it through the Rainbow wholefoods shop in Norwich. I left with some delicious homemade dehydrated crackers and one of each flavour go-go ball ,small balls of raw cakey goodness made with cashew nuts, dates and cocoa and either plain, goji berry or mint flavoured and we set off to find the Rainbow!!!
I would definitely go there again as I wanted to try everything on the menu, so refreshing to have so much choice for a such reasonable price (just under £6 for meal) and such good quality fresh food. 11 out of 10!


Wednesday 17 July 2013

Needle felted budgie picture


I was musing about making a needle felted budge,a little like this fellow, this yellow bird was one I made from a tutorial on Craftster If you haven't been on craftsters amazing forum pages,where have you been!!!!! Tutorials galore,inspiration posts about everyone latest crafty adventures and a great sense of community,Yay Craftster!!!!!!

Needle felted bird


I doodled a rough picture of a budgie but what I really wanted to do was play with my new Janome Embellisher. Ah lightbulb moment! Why not make a budgie picture! As I have played a little already,I know that felting onto premade felt is not a good idea. It gets a bit distorted by the Embellisher which is quite vigorous,especially if you stay in one place too long. I thought something more hard wearing like canvas would do the trick

I traced the picture onto canvas by sticking it on a window (my take on a light box)


This worked quite well as it was so sunny!!!


I then built up the colours,primarily with hand needle felting...


And then using the Embellisher to smooth and mix the colours. There is quite a bit of shrinkage involved so I had to keep re adding to the edges of the budgies body. At one point it got rather noisy and I realised that one of my needles had broken and was trashing the canvas underneath. I do not know if it was because the canvas material was a little too stiff or whether is was from my own over enthusiasm  !!! As I'm new to this it's hard to get the balance right between a base fabric that is hard wearing enough to take the repeated onslaught of the Embellisher (a quietly fierce machine!) and one that puts too much strain on the needles.


I continued adding to my picture using my hand needles and this is how far I have got at the moment


Sunday 7 July 2013

Granny blanket


Hi this is my latest granny blanket,it was supposed to be a granny stripe but I gave up that idea after trying 4 times with increasingly bigger needles for the chain. I am crocheting with a 4mm hook and even with a size 8mm hook for the initial chain it was still too tight and caused the edge to curve and warp. 


Any one got any ideas how to avoid this? This blanket is for my sofa to compliment the patchwork throw I have on there which is a little pale. It's kinda loosely based on lavender,am loving the colours so far.


My last blanket has gone to a dear friend and I miss it! It was much brighter!


Thursday 27 June 2013

Low fat ice cream sundae


Needle felted strawberry ice cream sundae,this was an experiment after finding lots of sundae dishes in my local shop on offer and being unable to resist the lovely bright colours!Also have a bit of an ice cream image obsession so fits in nicely with that. I did think it used much more fibre than I expected so not really an affordable option,was wanting to have a few in my kitchen as decoration but not sure i want to use up so much fibre! 

Thursday 13 June 2013

crocheted bag


This is the video for the cluster stitch bag from Clare at bobwilson123 on you tube. She has a whole amazing channel there which teaches the basics of crochet right through to crocheted flowers,hats,ruffled bags,afghans and much more! she also has a blog at http://www.bobwilson123.org/
I was very inspired by this bag to make my own version,using granny stitch instead of cluster stitch and starting with an oval (Clare's bag has a circular base) I made this by crocheting trebles(UK) around a base chain of 12 stitches and increasing at the sides to make the base lay flat


This resulted in an oval shape of 6 rows of trebles,I then started granny stitching to make the sides.


Was a bit worried here that the bag was just going to keep getting wider!  I am using the same number of granny stitches in every row so in theory the crochet should rise up to form the sides of the bag.


Have done more rows and am happier with it,I think its just a case of persevering. The wool I am using is 100% wool called wash+filz it fine (about DK I think) from Schachenmayr . I intend to felt the bag when it is finished to make it sturdy,am hoping the stitches will close up and look a liittle like weaving.

Monday 10 June 2013

Hi this is my first post,welcome to my blog which will be mainly about my many crafting hobbies with a bit of life thrown in for extra flavour! The latest thing i have made is a hat for Stamford tea party's Mad Hatter tea party. This was made from kitchen sponges and felt with a little help from my trusty glue gun, these were then glue gunned onto badge pins and attached to a furry hat.


This is the first five battenburgs done only ten to go!


I did want to mess with it more but everyone said it would detract from the battenburgs , so i resisted.

I have also been making little birds from needle felting, takes me ages as i have arthritis in my hands but as long as I don't go too mad I think it helps to keep my fingers active. I have also started making budgies, hopefully to be earrings but haven't a picture yet.


Likkle ikkle ikkle birds!